
What are we going to see in this article?
In this article you will learn how to configure the Diabox App to capture the continuous measurements of your child’s Free Style Libre 2 glucose sensor and see them in the Diabox App. If you want to share the glucose measurement data with the rest of the family you can do so, uploading them to your Nightscout website and connecting to it through the Diabox App installed on the mobile phones of the rest of the family (followers).
If you haven’t created your Nightscout website yet, I encourage you to do so now! To do it in a simple way, I recommend that you follow the steps that I indicate in my article «How to install Nightscout for dummies (like me)«. Surely you will do it easily!
Once you have created your Nightscout website, the question you are going to ask yourself is: how can we start continuously sending the data from our Free Style 2 Libre sensor to Nightscout?
To achieve this we have two ways to do it through software, as I mentioned in my previous article «How to make your Free Style Libre 2 a Glucose Continuous Meter«. The first is using the Diabox App and the second is through the LibreLink patched App.
Next, we will describe how to install and configure the first of these methods, which is a priori the simplest, using the Diabox App. But let me explain the different sections that this article will have:
- Diabox, the App that will make it easier for you to capture data
- How do I set up Diabox to send data to Nightscout?
- Abbott warning & Liability
- Conclusions
Diabox, the App that will make it easier for you to capture data
Diabox is an App created by a group of Open Source developers related to Bubblan, the company that markets the Bubble device to obtain continuous glucose measurements through hardware that is placed attached to the Free Style Libre 2 sensor.
Being a non-commercial Open Source App, the support in the updates and maintenance of it, falls on the Community.
This Community usually publishes the different versions of the App through several channels:
- Github: Versions of Diabox can be downloaded from the Bubblan developer’s page. It is not always updated with the latest versions, but you can download the latest versions of the Diabox App that work with the Bubble device.
- Telegram: The group of developers use Telegram to be able to communicate the release of the latest versions and solve doubts and questions about them related to development. Here you can find the latest versions of Diabox as well as beta versions.
- Facebook: This group run by Libre Hack is full of information about Diabox and is a good place to check if you have any questions or ask the Community. In the «files» section of the Facebook group you have a multitude of documents: guides, tutorials, etc. Everything is super useful!
How do I set up Diabox to send data to Nightscout?
The configuration of Diabox is quite simple and allows you to capture the data of the Free Style Libre 2 sensor even if you have not started the sensor with the Diabox App, but with the App of the manufacturer LibreLink.
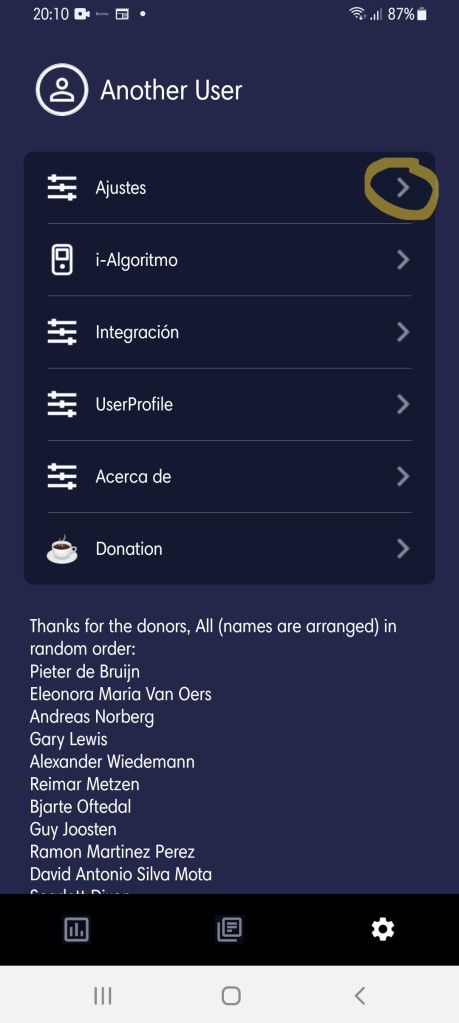
Diabox has a single drawback, that in older versions of the LibreLink App, when capturing the Bluetooth data stream, causes the Libre Link «signal loss» alarm to be connected and you have to disconnect it and lose that service through that App. This is not a problem a priori because the signal loss alarms can also be configured in Diabox and so you do not lose this functionality. To do this you will have to go to «Settings» and there select «More Alarms». On the screen that opens below, you can configure all the alarms
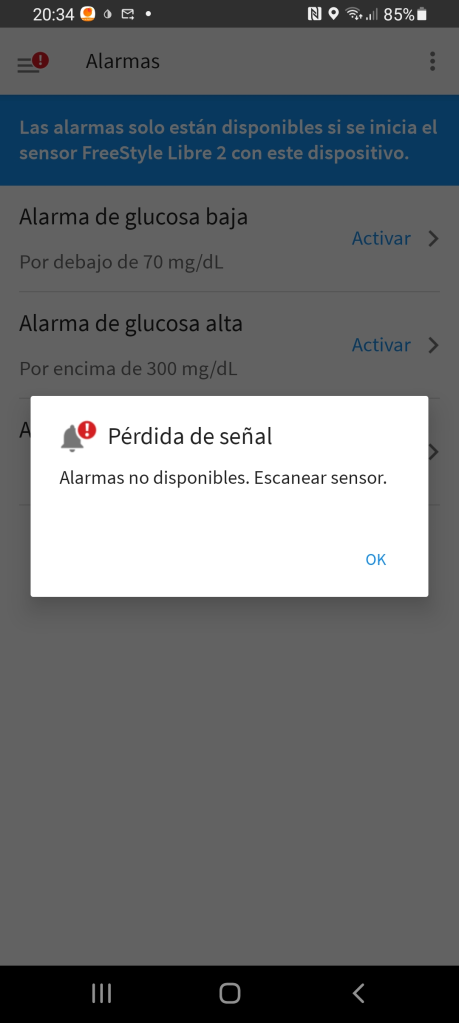

Another «old story» that should be demystified is that Diabox readings are lost in the manufacturer’s Librelink App. In my case when I installed Diabox, the Abbott Librelink App didn’t stop working, nor the sensor readings were stored when I read them with the NFC of the mobile, nor when the alarms had to sound for high or low glucose alerts. The only problem with older versions is with the «signal loss» alarm as I indicated above.
But hey, let’s get into work! I’ll indicate below the steps you have to follow to install Diabox on the mobile with which you do the glucose sensor readings:
Download Diabox App from the Telegram channel
You can download the Diabox App from several repositories. You can do it from the Github of the Bubblan developers, although they do not usually have the latest versions of the App, only those that have proven to work well with the Bubble.
My recommendation is that you do it from the Telegram channel of the developers of Diabox. I currently have version Diabox libre2-2022_12_29_beta2.apk installed “apk” and it is working great.

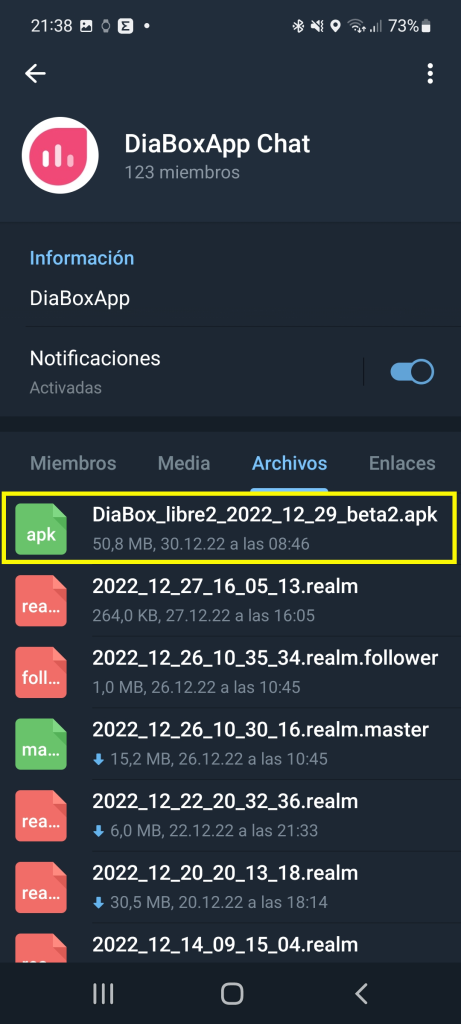
It is important that you download this App on the Android mobile from which you are going to make the readings of Libre 2 sensor, because the App that we will be installed is the one that will be the Master of the system and will send the readings continuously to Nightscout.
Once you have downloaded the App that you will find in the Downloads folder of your mobile, click twice on it and install it. You will probably have to enable the option on your mobile to install third-party applications. It will be asked when you will install the App, so you will have to give authorization to do it so that it can be installed.
In a few minutes we will have the great new Diabox App installed on our mobile. As soon as you start the App you will have to accept the conditions that indicate that Diabox is not suitable to make medical decisions and that you can use it, but that there is no guarantee. This this is important!, because Diabox is not a commercial product and therefore everyone who uses it is assuming responsibility for its use. After accepting the conditions, the appearance of the App is what you can see below.
Now we can move on to the next step!

Connect the sensor to Diabox
For Diabox to start receiving signals from the glucose meter sensor, it needs to be scanned in a similar way to what we do with the Abbott Librelink App.
To do this, you must go to the settings menu, as indicated in the image below. In this menu select the option «Add Bubble».
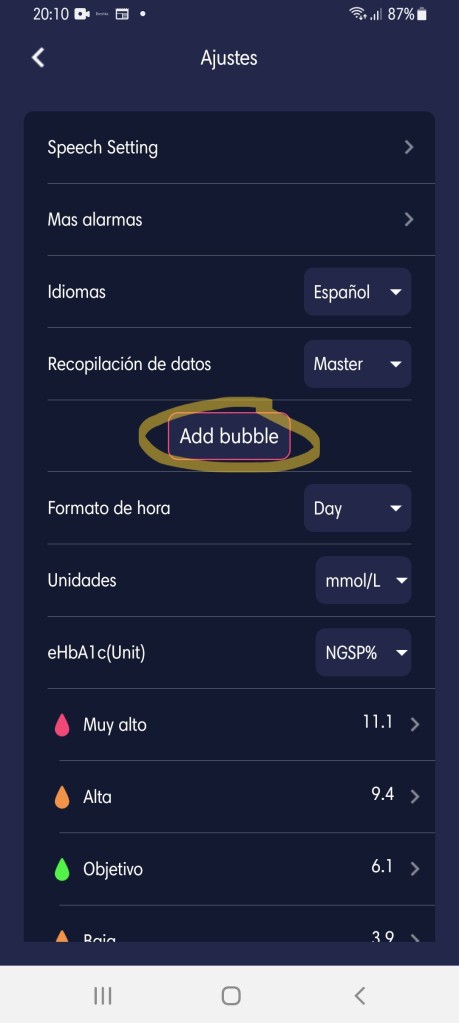
In the menu that appears below select the sensor type «Libre2 EU BLE Direct» (or select the glucose sensor model you are using). You will have to agree to the Diabox App being granted Location permissions for Bluetooth to work for you.


Next, a screen will appear that will tell you to scan the sensor with the mobile by NFC (putting your mobile touching the sensor). It will also ask you if you want to start a new sensor, and you will have to say yes.


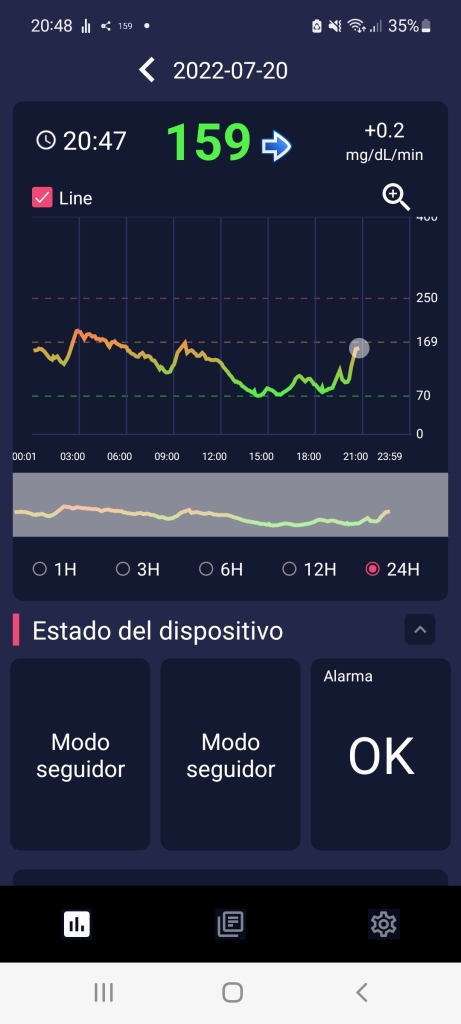
At that moment the measurement values of your glucose sensor will begin to arrive via Bluetooth to Diabox. No need to be reading the sensor every time with the mobile by NFC!


A tip, if you want to see the glucose measurements in mg/dL (in the image above with value 158) instead of in mmol/L (in the image above 6.3), you can change the units of measurement within Settings in the Units section.
And at this point, the Magic is already done! and with these simple steps we will have managed to transform our Free Style Libre 2 sensor into a continuous glucose meter!
The truth is that having already achieved continuous glucose reading measurements without having to scan the sensor every time is cool. But surely you want continuous glucose measurements to be shared with other users (father, mother, grandparents, etc.) and even be able to store the measurement data in your own information repository (which, by the way, you own your data!).
To share the data with other mobile phones and Diabox Apps can be done directly through the Settings menu, in the Data Collection section and indicating the mobile user of the person who wants to follow the readings (Eye, not on the mobile that is capturing the readings by Bluetooth). This is done with the «Diabox Follow» option.
At first I used this option, but it only let me configure a «follower», so I do not recommend it. In my opinion it is better the option to send the information to Nightscout, because that opens a new world of possibilities, storing the information on your own Nightscout website.
Upload glucose measurements to your Nightscout website
Nightscout is an open platform that will allow you not only to store the data, but to be able to share it with other applications and therefore build any solution that you can imagine based on your data. That is where the key and the power of Nightscout is, that as it is a service that you have deployed on your own web site, you are owner of your data and therefore you can use it for whatever you want.
For this purpose, we are going to configure Diabox so that you can send the data to Nightscout. Enter the «Integrations» section of the menu and there you will find a field that says, «Upload to Nightscout Share Server». There you will have to enter the URL (address of your Nightscout website) as well as the API key that you indicated when you created the Nightscout service in ns.10be.de. I attach some images of how I have configured it with the server example that I created in the article where I explained how to configure Nightscout.


And once you have connected your Diabox App with Nightscout in this way, after a few minutes the data will begin to arrive at your Nightscout website. It is awesome to see your data flowing in Nightscout!

Share glucose measurements with other Diabox users
As soon as our data reaches Nightscout, we have a centralized storage repository of our glucose measurement data and therefore, it can be shared with anyone you want.
A very simple way to do this is by installing Diabox on another mobile, such as your parents or grandparents of the kid with diabetes mobile phone and activate the «Follower» mode of Nightscout in Diabox. In this other App you do not have to do the previous steps or read the sensor again with NFC. You just have to configure that App as «Follower».
To do this you will have to enter Settings again and in the «Data Collection» option select the «Follower Invitation» option. Once selected, a field opens below where you can incorporate the URL of your Nightscout website and also if you have defined a «token» to access you can also introduce it below the URL box. And almost immediately you can start tracking the data of your child with diabetes by receiving them continuously wherever you are.

Setting Alarms in Diabox
Configuring the alarms in Diabox is very simple and tremendously useful because of the variety of configurations it has. To do this you have to enter Settings and then in the option «More Alarms». There you can configure the alarms of signal loss, low battery, alarm of very high, high, low and extremely low values. There is also the possibility of setting alarms if the glucose level rises or falls very quickly (rate of increase or decrease) and even to warn you when the sensor is about to end its useful life. The truth is that the alarms are all very flexible and can be configured with sounds or vibration.


Statistics and summary values in Diabox
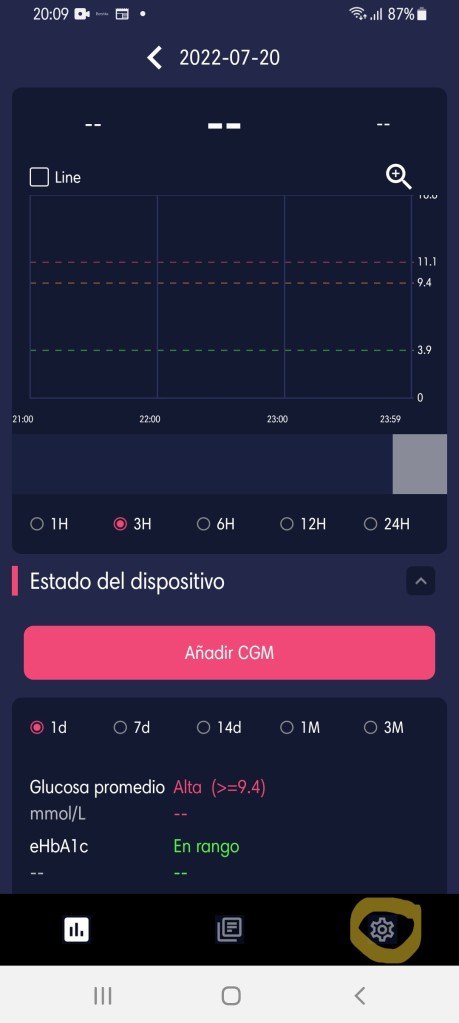
Diabox has a feature that makes it extremely useful and is the estimation of statistics by periods, which allow you to quickly have information on whether you are keeping track of your child’s glucose levels.
If in the initial menu you slide down the screen with your finger you will see the values of average glucose, the famous «glycosylated» (eHbA1c) as well as the percentage of the time that your child has been in range (between 70-170 mg / dL I have it defined) or has been high or has been low. The great advantage of these statistics is that they allow you to visualize them quickly by clicking on the interval where you want to see this data (1 day – 3 months), which gives you the most relevant information in the time intervals you want.


In this example you can see how we controlled my daughter’s glucose levels very well today (with 100% in range) and the historical 3 months we do not take it badly (70% of the time in range and 6.9% of glycosylated), although it could be improved to try to reach the best-in-class 6.5%.
Abbott Warning & Liability
On January 2023, I received an email from Abbott warning about the possible harms to health that extended use of Libre 2 sensors with Diabox could cause. The email I received said: «Diabox is an unauthorized application (Diabox) that poses a serious health and safety risk to consumers. These are used to extend the Freestyle Libre sensor and has not been authorized by Abbott. Use of this application could pose a health risk to users». So please, do not use the Diabox app to extend your sensor’s life because of the risk it could pose to your health.
The use and installation of the Diabox App is completely voluntary, so the responsibility for the use of the App lies with each user and any potential consequences it may have on health are the responsibility of the person who has made the decision to install and use the app.
The purpose of this article in the blog is solely didactic, to show how the app could be used, but Digital Diabetes or the author of the article cannot be held responsible for the operation of the app or the way it is used by each user. This responsibility lies with each user.
Conclusions
As far, as good! I hope this article could help you to install, configure Diabox and connect it correctly to your Nightscout website.
If you have selected this method to transform your Free Style Libre 2 sensor into a continuous glucose meter and you are able to share these measurements with the rest of the family, congratulations! I think you have chosen one of the best options.
The truth is that we must thank Libre Hack and the entire developer community behind it, because they have managed to make an App extremely easy to use and even with more features than the official Apps of some manufacturers. So, thank you very much for everything!
I want also to take the opportunity to say goodbye to all of you and I hope this article has been useful.
Regards,
Daniel

2 respuestas a “Diabox. The App that measures your glucose continuously and shares it via Nightscout.”
I cant get readings by bluetooth with Samsung A52G and FreeStyleLibre 2. Im doing every step like in tutorial, scanning NFC and it shows everything but later phone wont update sugar measurement by bluetooth. Please help
Me gustaMe gusta
Hello John. Most probably LibreLink App is stealing Bluetooth connection and so you have to scan again with Diabox to link it with the sensor again. If you have followed instructions on the article, it should not happen
Me gustaMe gusta