Can we continuously measure glucose levels?
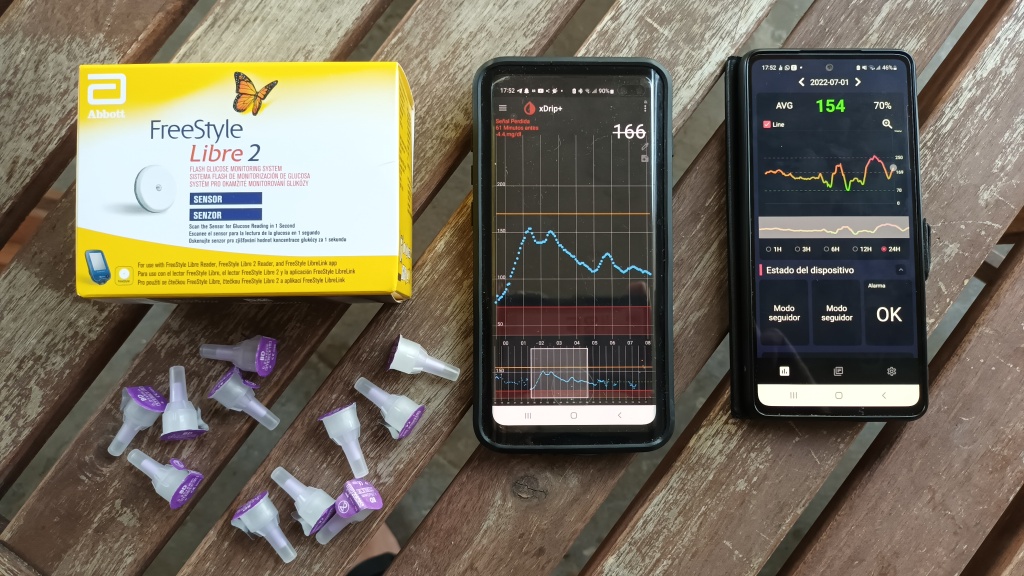
I have started writing this post because one of the most important advantages we can obtain thanks to technology is obtaining continuous glucose measurements on our mobile phone, which prevents us from having to obtain this data by manually reading the sensor through the NFC reader of our mobile.
This will allow us to have a continuous control over glucose measurements simply by looking at our mobile phone or our smartwatch, which significantly increases our comfort.
Manufacturers have finally begun to bring continuous measurement sensors to the market, as is the case of the Abbot Freestyle Libre 3. Unfortunately, this type of sensors are not yet funded by Spanish Public Health Authority (Social Security) in the different Spanish states (at least until the date of this article in July 2022). That is why I think it is very interesting to write this article in order to achieve the functionality of continuous measurement with the most common sensor today that is the FreeStyle Libre 2 and that is the one that they provide us in the State of Madrid (Spain).
The methods I know today to achieve continuous measurement can be using hardware or software.
Continuous measurement via hardware
Using Hardware: This implies that we have to put an additional device to our sensor on top of it and that will be responsible for making periodic readings on the sensor. There are different types of devices:
- MiaoMiao:
- It is a square white reader that is positioned attached to the sensor and that connects directly with your mobile to send the measurements continuously.
- Link: Web
- Features: Sending measurements continuously to the phone, automatic alerts, allows you to share measurements with the family, is IP67 to resist water and is recharged by battery
- Compatible apps: Tomato (MiaoMiao’s own app and comes to version 3, iOS/Android), xDrip+ (Miaomiao 1 and 2, Android), Spike (Miaomiao 1 and 2, iOS) and Glimp (Miaomiao 1 and 2, Android)
- Price (16-07-22): 179$ (Miaomiao 3 Smart Reader)
- Bubblan:
- It is a white reader shaped device like a cat face (😊 and it is not the MiaoMiao) that is positioned attached to the sensor and that sends the measurements continuously directly to the mobile
- Link: Web
- Features: Sending measurements continuously to the phone, automatic alerts, waterproof (30 minutes at 2m depth), rechargeable battery (10 days of autonomy)
- Supported apps: xDrip+ (Android) and xDrip Swift (iOS), NightScout (Web), Diabox (iOS/Android)
- Country of origin: Sweden
- Price (July-22): 148,68€ (Bubble Mini Glucose Monitor)
Continuous measurement via software
Using Software: We connect in this case directly to the sensor through a mobile application wich captures the glucose readings and displays them in the App. This method avoids having to install a hardware device attached to the sensor. There are different Apps that allow you to do this:
- Nightscout
- Nigthscout is the platform that will allow you to store all your data in the cloud and dispose of it through a website you own.
- Nightscout began as an Open Source initiative in February 2013 where parents with children with diabetes developed solutions to help them in their day to day thanks to technology (does this idea rings the bell?).
- To upload glucose measurement data to Nightscout, you use data collectors (uploaders) such as Diabox or the patched App. Once we have the data on your Nightscout website we can download and share it with other users through XDRip or Diabox in real time.
- Creating your own Nightscout website where you can upload your data, store it and then share it is the first step for many other Nightscout-based apps that will allow you to view continuous glucose data, visualize the data on your smartwatch, broadcast messages by Alexa when there is hypo or hyperglycemia, etc.
- Installing Nightscout is not trivial, but I have created a tutorial to explain how to do it step by step. Surely following it you will not have any problem!
- Installation tutorial: How to install Nightscout for dummies (like me) (Spanish)

- Diabox:
- It is an App developed by a team of developers related to the Bubblan product and that allows you to read manually directly from the sensor (without the need for Bubblan)
- It supports traditional reading through the Freestyle LibreLink App. That means that readings reach both Apps.
- Link: Github repository. App to download on Android (version v20220215)
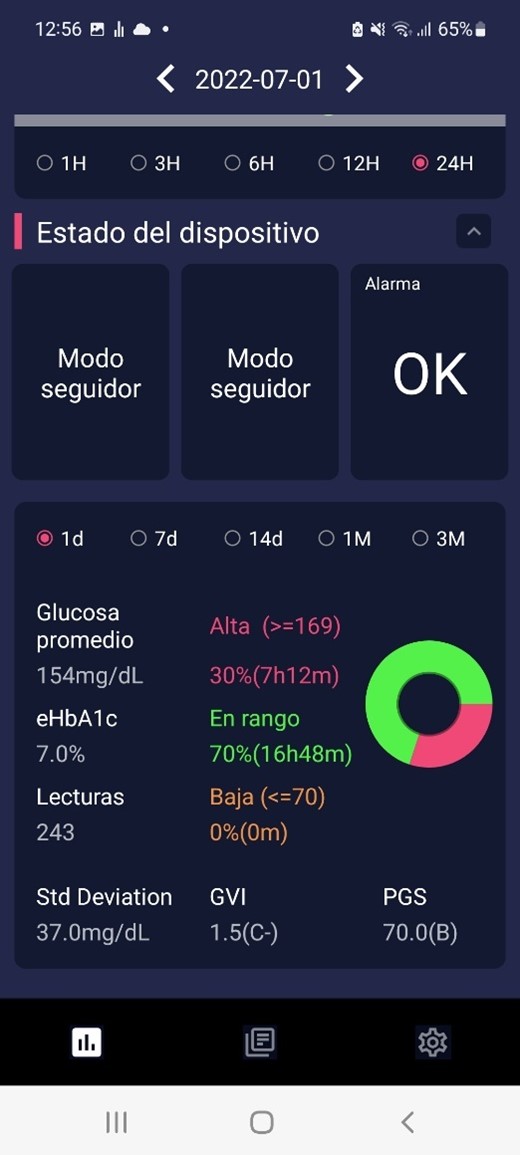
- Pros: It is an easy solution to install and connect with the sensor and gives a lot of information, which is very well structured and easy to understand. You can even connect to Nigthscout and send measurements to other mobiles to share them.
- Cons: The alarms stopped sounding in the Freestyle LibreLink App and only sounded in Diabox. Alarms could be configured on Diabox App.
- Diabox installation tutorial: The App that measures your glucose continuously and shares it via Nightscout (Spanish)

- xDrip+
- It is the best Open Source glucose monitoring App, developed by the Open Source NightScout developer community
- It allows you to connect to a multitude of different sensors and specifically to the Freestyle Libre 2 through the Patched App. The patched App acts as a data collector to send it to XDRip and is the first thing to install.
- Patched App installation tutorial: The Patched App. We solve the mystery of how to create it! (Spanish)
- There are alternative methods to collect the data, such as OOP2, but I have not tried..
- Once you have installed the data collector, you have to install the XDRip App to visualize the continuous glucose measurements on your mobile.
- XDRip installation tutorial: XDrip. The Open Source App most used by the Nightscout community (Spanish)
- Pros: It is the gateway to the mobile management of the NigthScout website, where you can have your repository of data of glucose measurements, as well as the info of the amount of insulin and the carbohydrate rations you take. It is the most complete App in functionalities.
- Cons: Because the number of functions you can use is so complete, it can be difficult to understand some of the features. The configuration for different sensors must be done through a tutorial because it is not simple.


Conclusions
It is important to say that there are probably more methods to obtain the long-awaited continuous glucose measurement, but they are not included in this article mainly because I have not been able to test them or because I do not know them. As far as I will test more systems, I will update them in this article to explain the main features and share with you my opinion of all of them.
In next articles of this Blog, I will go into detail on how to configure each of these methods, so that you could have a very simple tutorial on how to use each of these methods to achieve the continuous measurement of your FreeStyle 2 sensor.
Also in the following weeks I will keep on translating the rest of the articles of my Digital Diabetes Blog to English. Then I will update the links of this article to the English version of the guides.
I hope you have found the information in this article useful, and I wait you in the next article of Digital Diabetes!
Regards,
Daniel
