Smart watches. How to have your blood sugar always at hand.
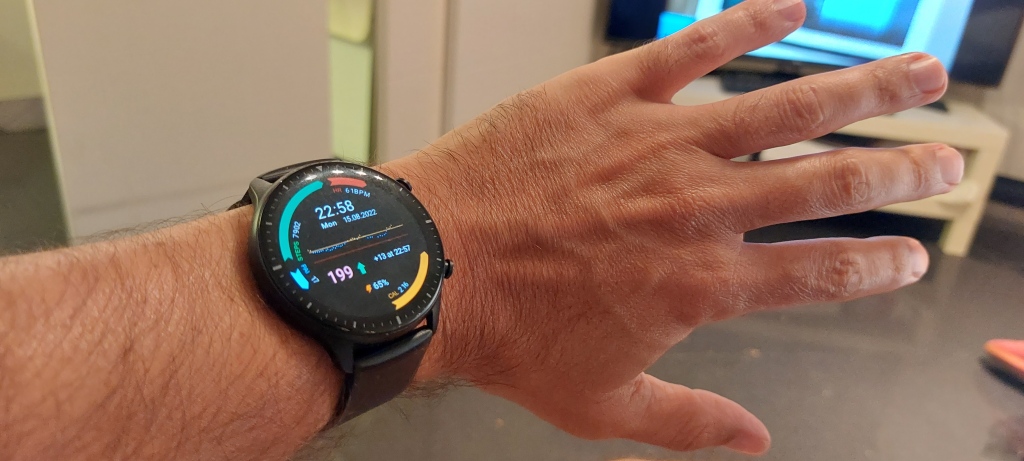
After several months of experience as a father of a wonderful girl with diabetes, my daughter Luchi, I was tired of having to take my phone out of my pocket every time I had to consult a glucose measurement. Nor did I like, when I got home leaving the mobile in my room and wanted to consult a glucose measurement of my daughter, having to go around my house until I reached the mobile (although my house is small, I never remember where I left the mobile!).
Reading the Nigthscout website #WeAreNotWaiting, I managed to have the glucose measurement continuously on my mobile thanks to XDRip (if you also want to get it, do not forget to read my article «How to make my Freestyle Libre 2 a continuous glucose meter (GCM)«). But now what I want is that my daughter’s glucose measurement could also reach my smart watch, which I always carry with me. Because just with a simple glance, the watch could give me all the necessary information to know the glucose level of my daughter Lucia and notify me in case of having any alarm for high / low glycemia.
The best repository of information I found to update my smartwatch and transform it into part of the glucose tracking system was Nightscout’s «How to display Nightscout data on yout watch«, which was very complete for Pebble watches and Android Wear OS, but it was not for more modern watches such as Xiaomi Miband or Amazfit that are very common today for their good quality / price ratio. Searching and searching, I have also found more detailed information about other models of smart watches (thank you very much for your blog Artem!), so I am going to share all this info that I found in this article.
You can see below a scheme of the different options that Nightscout has to deploy the system that will allow you to see your daughter’s blood glucose on a smart watch. It is very useful to understand well everything we have done so far in past articles (Nightscout, XDRip, Uploaders, etc.) and see what we are going to do now to bring glucose data to smart watches.
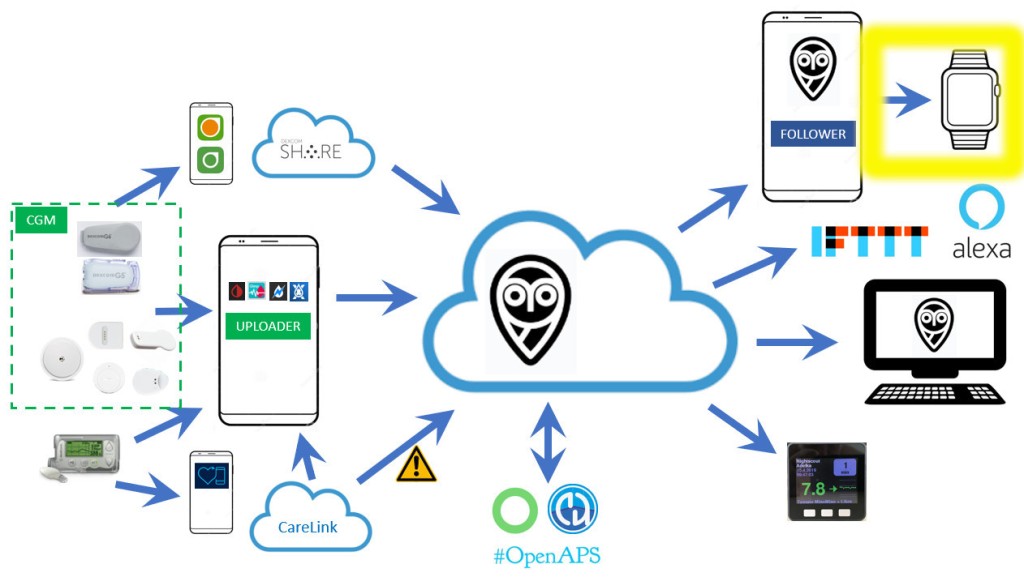
In order to help you to get the info of the glycemia of your children both in his watch and also yours, I will summarize in this article all the information I have found about each watch model. I’m sure you’ll find it useful!
The smart watches that I am going to teach you how to configure are the following:
- Pebble Smartwatch
- Android Wear OS smartwatches
- Xiaomi MiBand Smart Watch, Amazfit Band and Amazfit GTR and GTS
- Apple Watch smartwatches
- Fitbit smartwatches
- Samsung Galaxy smartwatches
- Garmin Smartwatches and Devices
Pebble smartwatch

Pebble smartwatches represented the first milestone reached for visualizing blood glucose data on your wrist. Pebble was a revolutionary watch brand because it used an electronic ink screen (like the e-book), which allowed its battery to last 150h (almost a week). Engineer John Costik, founder of Nigthscout, in 2014 developed the first application to connect a Dexcom G4 glucose sensor, with a spreadsheet hosted in the cloud that saved the data and displayed it on a Pebble watch. His goal was to see the blood glucose of his son Evan in real time and continuously. If you are interested in his story, you can read it in my article «How to install Nightscout for clumsy people (like me)«.
Pebble was later bought by Fitbit in 2016 and on December 7, 2016 Pebble announced that it was ceasing operations. Despite this, two days later, the community of Pebble users created «Rebble«, a website where many of the resources developed for Pebble were maintained and which is still active today. Pebble support continues to be maintained for Loop, AndroidAPS, FreeAPS and XDRip+ systems.

If you want to know more about the history of the Pebble smartwatch, I recommend this article from Xataka: «Rise and fall of Pebble: its creator tells why the smartwatch that created (he alone) an entire industry failed«.
The most interesting resources to use with Pebble are as follows:
- Pebble App: For IOS you can download it from the Apple Store and for Android you can download the App at these links: AppMirror or APKPure.
- Watch face: To authenticate and use watch faces, you need to register with Rebble. The faces of the Nightscout watch are here. You will need to configure the watch faces with the address of your Nightscout website.
- Urchin: It is a specific sphere to view glucose data in graphical format. Your Github repository is here: Urchin. You can use it with Loop, AndroidAPS and FreeAPS.
To install Pebble with XDRip, you need to configure the App as I’m going to tell you below. If you don’t know what XDRip is or how to set it up, I recommend you read my article «XDrip. The Open Source App most used by the Nightscout community«.
The steps to follow are as follows:
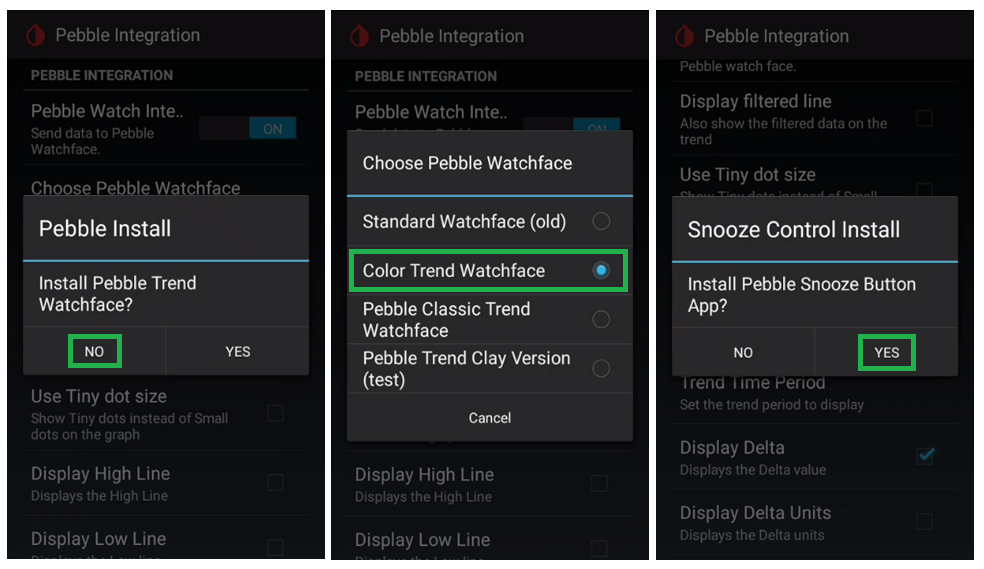
- Activate the integration with Pebble: through Settings -> Smartwatch functions -> Integration with Pebble -> Integration with Pebble Watch.

- Configuration of watch face and «snooze» button: next, you will be asked if you want to install the default face. If you say no, it will allow you to install other dials for your Pebble watch. And at the end of the process, it will ask you if you want to install the «snooze» button that is used to confirm that you have seen the alarm and delay it a few minutes.
Android Wear OS smartwatches
Wear OS (or formerly known as Android Wear) is the operating system developed by Google and launched in March 2014 for smart watches of various brands. In 2014, major smartwatch manufacturers joined this operating system, such as Motorola, Samsung, LG, HTC, Sony and Asus. In 2018 Android Wear was renamed Wear OS and became the base platform of Google Fit, Google’s App to monitor physical exercise. In 2021 Google finished the acquisition of the manufacturer Fitbit bringing to market the new models with its new version Wear OS 3.0, becoming one of the most important smartwatch operating systems on the market.
Depending on the operating system version of your smartwatch, the methods to connect it with XDRip and be able to see the data on it are different:
Android Wear 1.x
This operating system was used in the first generation of smartwatches that carried the Android Wear OS, such as in Sony Smartwatch 3. The problem with smartwatches that carry this operating system is that Google stopped supporting them in 2020.

The process you have to perform on your watch is as follows:
- Install an older version of Android Wear on your phone and pair your phone with your watch. You can find the old version of Android Wear in this link
- It allows you to access the GPS and position through the watch.
- You’ll need to manually update Google Play Services by following this tutorial.
- You can now upgrade from Android Wear to Wear OS.
- Change your watch face until it matches the App (on Wear OS or App)
Android Wear 2.x
Android Wear debuted as an operating system in 2017 (article by Xataka), making Google a significant improvement to its interface, including a new design and animations. The Android Wear 2.x operating system is found in the Asus Zenwatch, Huawei Watch, LG Watch, Moto 360, Casio Smart Outdoor Watch and Pro Trek and Fossil Q smartwatches among others.

The steps you have to perform on your watch are as follows:
- Install Wear Os 2.x on your smartwatch via this link.
- Allow GPS and Wear OS to access your location through your phone
- Let Wear OS run in the background on your phone
- Install the Wear Extension App from your watch’s Google Play Store. Most modern versions of Wear OS have to use Wear Installer. You can see how to do it in this video.
- Change your watch face until it matches the app (on Wear OS or your watch)
xDrip+ Configuration
Once you’ve prepared your smartwatch, we need to configure XDRip+ to send glucose measurements to it.
The steps to follow are as follows:
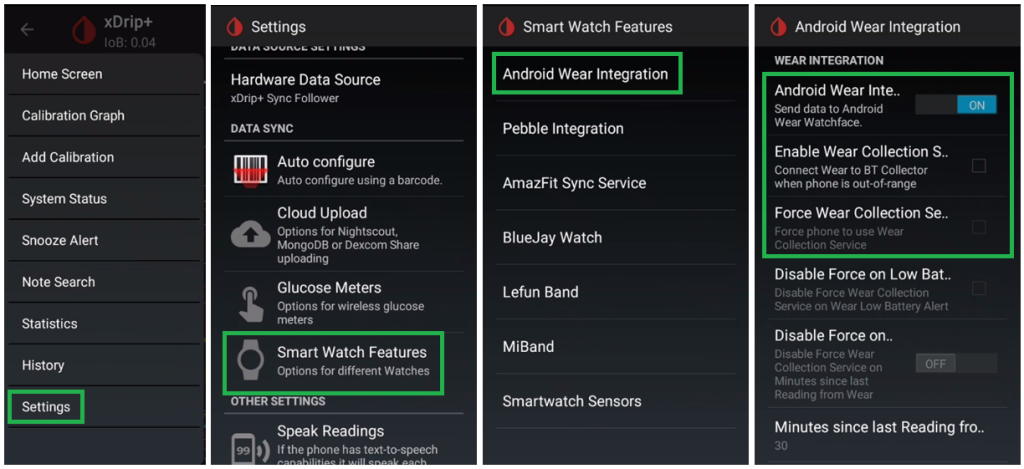
- Activate the integration with Android Wear: through Settings -> Smartwatch functions -> Integration with Android Wear -> Integration with Android Wear.
- Don’t turn on » Turn on Wear collection service» or «Force Wear pickup service»
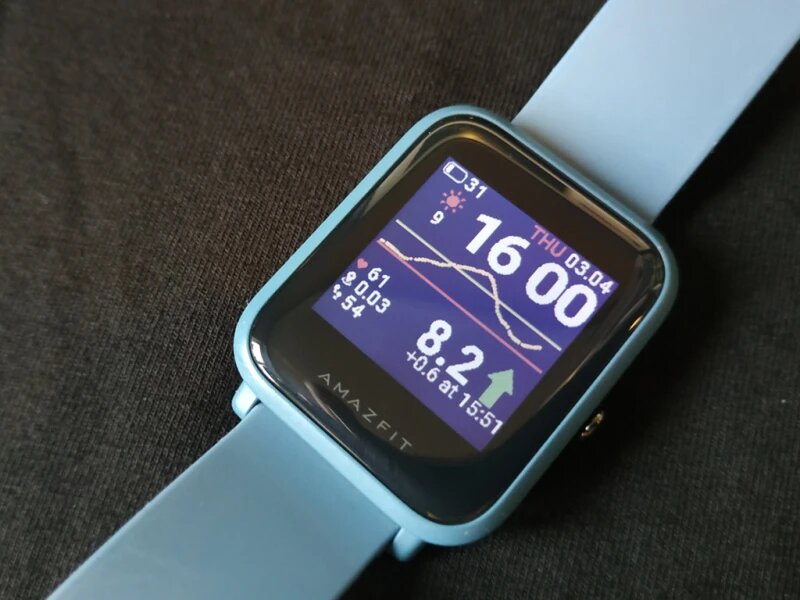
Xiaomi MiBand Smart Watch, Amazfit Band and Amazfit GTR and GTS
Xiaomi’s Amazfit smartwatches are one of the most popular watches currently for their good quality/price ratio. The models that can be configured to display continuous glucose measurements in XDRip are as follows:
- Xiaomi MiBand 2, 3, 4, 5 and 6
- Amazfit Band 5, Bip, Bip Lite, Bip S and Bip S lite
- Amazfit GTR2, GTR2e, GTS2, GTS 2 mini, GTS2e, GTR42 and 47
The integrations with this brand of smart watches with XDRip must be thanked to Artem, which has published in its blog different tutorials to be able to integrate all the models of Mi Band and GTR / GTS. You can access his Blog through this link.
There are several tutorials on the web to do this integration and the truth is that they are not very easy to follow. In my case, the one that has worked best for me is the one published by Artem in July 2022 that uses the WatchDrip + App. You can access the Artemi tutorial through this Link.
Here are the steps to connect your watch with XDRip:
Obtaining the Authentication Key
In order to uniquely identify our smartwatch by XDRip we need to obtain the Authentication Key of our watch. To do this we will have to install on our smart watch a variant of the original Xiaomi App for the MiBands (MiFit) or for Amazfit (Zepp).
The steps are as follows:
- If you already have your smartwatch installed on your mobile, you must unlink it and uninstall the original App (MiFit or Zepp)
- Download the patched Xiaomi App (MiFit) or Amazfit (Zepp) from the Freemyband website. This App that you are going to download, depending on the watch model, will allow you to obtain the authentication key of your watch. If you have any problems downloading this App, here is a direct link for MiFit (Xiaomi) or Zepp ( Amazfit).
- Once the MiFit/Zepp patched App is installed, launch the App and log in with your account email and password. Create an account if necessary.
- Pair your smart watch with the patched MiFit/Zepp App. To do this go to «Profile» and click on the «Add Device» button
- Turn on watch visibility in MiFit or Zepp settings. If you do not see this option, check that the age you have set is over 18 years.
- Now you will be able to uninstall the patched MiFit/Zepp App and reinstall the official App. It is important that you identify yourself with the same email you used in the patched App.
- Warning. If you have a MiBand2 or 3 you will have to perform a manual authentication and you can skip this step.
Configuration in xDrip+
Once we have obtained our authentication key, we will have to configure XDRip to send the blood glucose values to our smart watch.
To do this we will follow the following steps:
- Install a version of xDrip later than 10.07.2022. You can download it at this link.
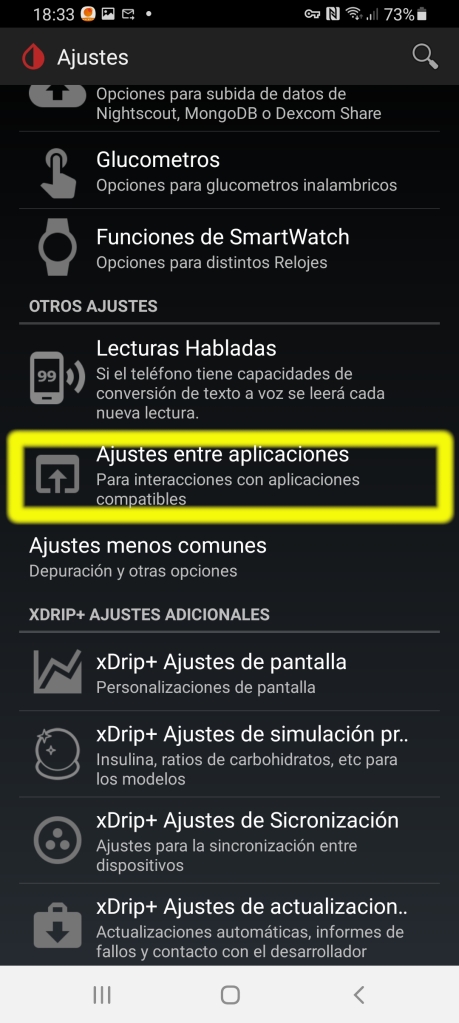
- In the Settings menu, turn on the option to broadcast locally and select Broadcast Service API.

- If you have selected the option in Settings -> Smartwatch functions -> MiBand -> Use MiBand. Disable it as it is an old function that is no longer functional.


Configuring WatchDrip+
Until the WatchDrip App was developed by Artemis, the configuration of Xiomi Amazfit/Miband’s watches was not very simple and was very limited, as you could only display a «default» dial on your watch. Now everything has changed for the better thanks to WatchDrip.
Here are the steps you must follow to install and configure WatchDrip:
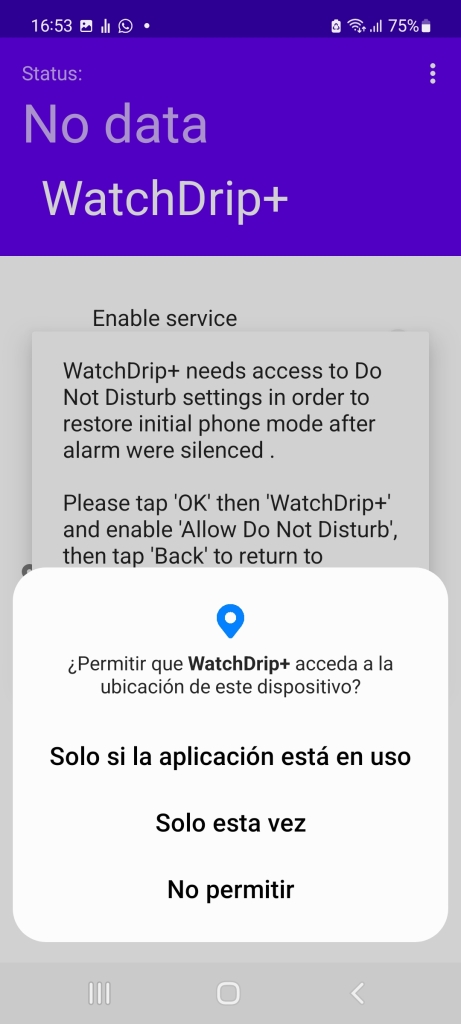
- Install the WatchDrip+ App on the mobile where you have XDRip installed. You can do it in this link.
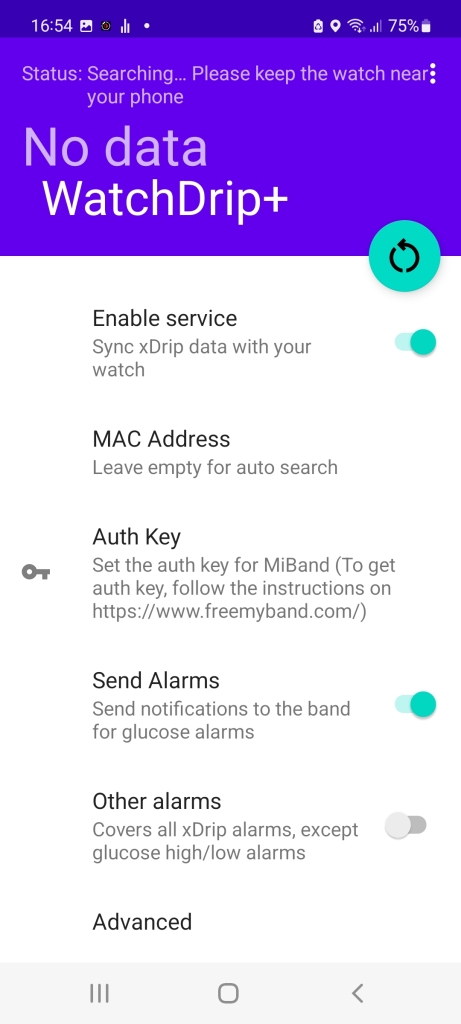
- Once you run the App, activate «Enable service» on the main screen and grant the permissions requested. It is important that you also authorize the «Do Not Disturb» permission so that a high/low glucose alarm can sound despite your mobile being in «Do Not Disturb» mode.

- At this point, in most cases, the watch will automatically meet and you will see a notification with the name of the watch. The MAC address of the clock will be populated at that time. If this happens, you can skip the next two steps.

- If the App does not find the MAC or the MAC is not correct, you will have to enter it manuallymente. The MAC is a code similar to this: FF:EE:DD:CC:BB:AA (6 pairs of digits with hexadecimal values separated by semicolons). To find these values in MiFit you have to enter «Profile -> Device Settings», scroll down the screen and press for a while where it says MAC to copy its value. In Zepp you have to enter Profile, open settings and click on «About this device» and then click for a while on MAC and this value will be copied to the clipboard.
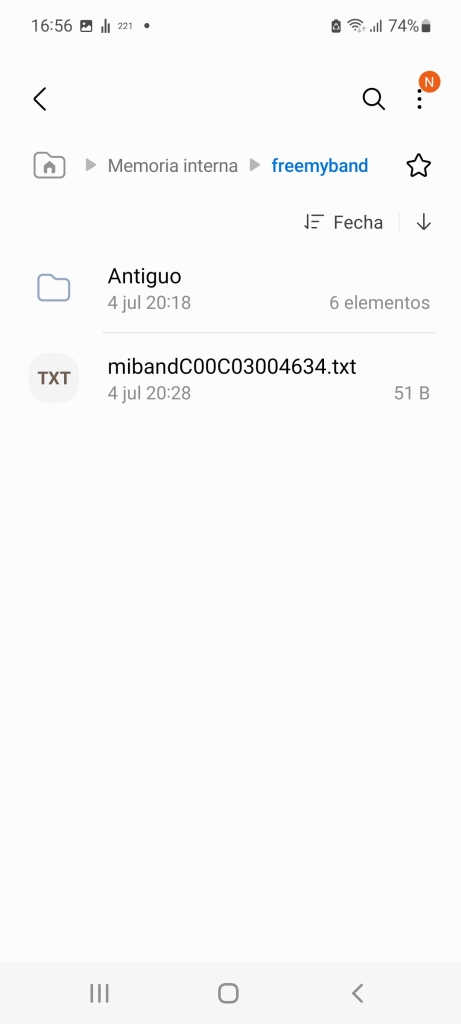
- If the App does not find the Auth Code, you will have to search for it on your mobile through the file explorer. It is located in the «freemyband» folder that is in the root directory. In that folder there is a text file, which if you open it you will see first the MAC of the clock and then the Auth Code. You can copy and enter it manually in the WatchDrip App.

- As soon as the watch is connected, you will see a message of «connected smartwatch» and if you press the green upper right button with the circular arrow the measurements will be updated and you will be able to see them at the top of the screen, which will go from putting «No Data» to the readings appear.
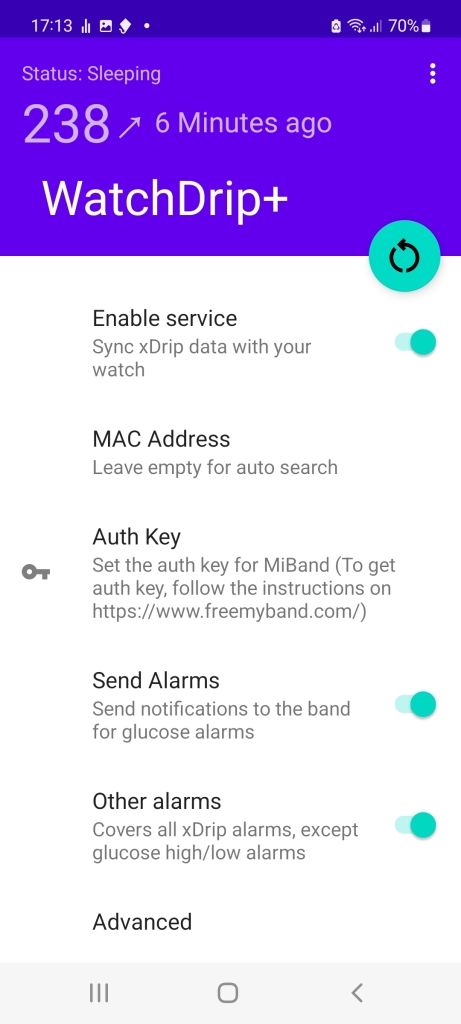

- In the WatchDrip menu you have very interesting settings: «Send Alarms» to activate the high or low glucose alarms configured in XDRip; «Other Alarms» to send all other alarms. And if you select «Advanced» you can connect and disconnect the vibration every time you do a reading (super important if you want to sleep without the watch vibrating all the time!) or even add custom watch faces.


- If at any time you stop receiving the glucose measurements on your watch (it happened to me once after a month with WatchDrip installed), the way to restore the service is by desisting the application and reinstalling it. And all solved! (you know that restarting the computer when something does not fail, always work! It is the oldest trick of computer science 😉 )
The truth is that after trying several tutorials to be able to visualize the glycemias in my Xiaomi / Amazfit watch and suffer for not getting it, this method that I have shared with you, obtained from the Artem Blog, is the simplest and the one that works best. So, thank you very much Artem!
Apple Watch smartwatches
Apple Watches are an example of how you can make a direct integration with Nightscout without needing a gateway like xDrip. In this case, integrating with an Apple Watch is as simple as downloading the Nightguard App from the Apple Store and installing it on any mobile with Apple IOS.

Nightguard is an application created by Nightscout to be able to follow the glucose measurements uploaded to your Nightscout website on any IOS watch. It is quite basic, but effective. If you want to access the code repository of this App, you can find it in this link.
There are other Apps also available. I leave here their links in case youwant todo it with them: nsapple, Loop Follow or Gluco-Tracker.
Fitbit smartwatches
Fitbit smartwatches have always had a particular focus on health, exercise and wellness issues. That is why in the FitBit Marketplace itself there are several applications that offer us the possibility of monitoring glucose levels directly on our smart watch.

The applications that you can install on your Fibit watch and that connect with Nightscout are the following:
- Nightscout monitor: Fitbit watch models -> Ionic/Sense/Versa/Versa 2/Versa 3/Versa Lite. Link to repository.
- Glance: Fitbit watch models -> Ionic/Sense/Versa/Versa 2/Versa 3/Versa Lite. Link to Web.
- Sentinel: Fitbit watch models -> Ionic/Sense/Versa/Versa 2/Versa 3/Versa Lite. Facebook Group.
- Marclock: Fitbit watch models -> Ionic/Sense/Versa/Versa 2/Versa 3/Versa Lite. Link instructions.
Samsung Galaxy smartwatches
Samsung Gear watches are a very special case of smartwatches. Samsung decided to create a specific Operating System (OS) for its watches called Tizen OS, up to the Samsung Galaxy 4 model, which already carries Android Wear OS. That is why there are not many Apps for watch models with this Samsung operating system.
But don’t worry if you have a Samsung watch, there is a solution. The app developed by the community and that allows you to connect with Nightscout is called G-Watch App.
The manual to install G-Watch App on any of the Samsung watches, could be found in this link. There is also a fairly active group of users of these glucose monitors on Facebook.

The key to being able to install G-Watch on your Samsung watch, especially on the Galaxy 4, is that you install the App on the watch itself. My wife has this watch and the truth is that it has been very easy for me to install it, so I have written a specific article for it and explain it step by step. You can find it here «Samsung Galaxy 4 Watch. ¡Ver las glucemias en tu mano con elegancia!» (article in Spanish yet).
Garmin Smartwatches and Devices
The company Garmin, like Fitbit in a way, has specialized in the development of smart watches and other devices used for sports: training, cycling, trekking, etc. That is why their concern for health is high. Proof of this is that there are many applications in its particular Store, called Connect IQ, where you can download Apps that connect with Nightscout and that will allow you to see blood glucose on Garmin devices.
Here are some examples of developers who have created Apps that you will be able to find in the Connect IQ store and with which you can connect to Nightscout:
Although if you prefer to explore other options, if you do a search in Connect IQ for «Nightscout» you will be able to find many applications. You can access this search through this link.
I have to thank these indications to Javier Fernández of the Facebook group Nightscout Spain that has been the one that has given me the clues and indications necessary to see the glucose measurements in Garmin devices.
Conclusions
The truth is that looking back I see that perhaps I have written a slightly long article, but I think it has been worth it, because I have been able to review all the most current models of smart watches and I have included the tutorial of how to connect them with XDRip or with Nightscout directly.
As you have seen, there are many solutions to monitor your child’s glucose through your smart watch. In many cases, the complication to connect them is directly proportional to the cost of the watch. That’s why the cheapest watches are usually the most complex when it comes to connect them with Nightscout.
Either way, the most important thing is that there are solutions for almost all models of smart watches. You are not going to be left without being able to monitor the glucose measurements of your child in your smart watch or that of your child.
The truth is that I sleep much more peacefully now and above all, it is much more comfortable, since simply turning the wrist I can see the glucose measurement of my daughter Lucia on my smart watch. Even, at night I have achieved a higher quality of life, not having to sleep next to my mobile or having to get up in the dark to find my daughter’s mobile and see the readings live, because an alarm of low or high glucose did not stop sounding.
It has also been super useful to be able to follow my daughter Lucía at school, without having to be aware of the mobile. It is undoubtedly a great advance to make our lives much easier.
Well, without further ado, this article has come to an end! I hope you found it useful!
If you want to be informed of all the advances that occur in the community related to technology applied to diabetes, do not forget to subscribe to this blog (www.digital-diabetes/home/), which is made with all the love in the world and with an eagerness to share the Technological Heritage of Humanity among the entire community of parents of children with diabetes.
All the best!
Daniel


Deja un comentario